
I searched around for a simple guide on implementing PayPal Smart Button in a Laravel Website but couldn't find any. There are a lot of tutorials but they are now outdated as the PayPal API has been upgraded.
In this tutorial, I will take you through a simple implementation of PayPal Smart Button on your Laravel website which requires minimal coding efforts.
For this example, I am building a minimal e-commerce project which has a single product (a book) and we will email the book to the user once he successfully makes the payment via PayPal Smart Button.
Let's break down the process in steps, and we will go over them one by one.
Before diving into the steps make sure you have Setup your PayPal development environment and have the required APP client-id and the secret.
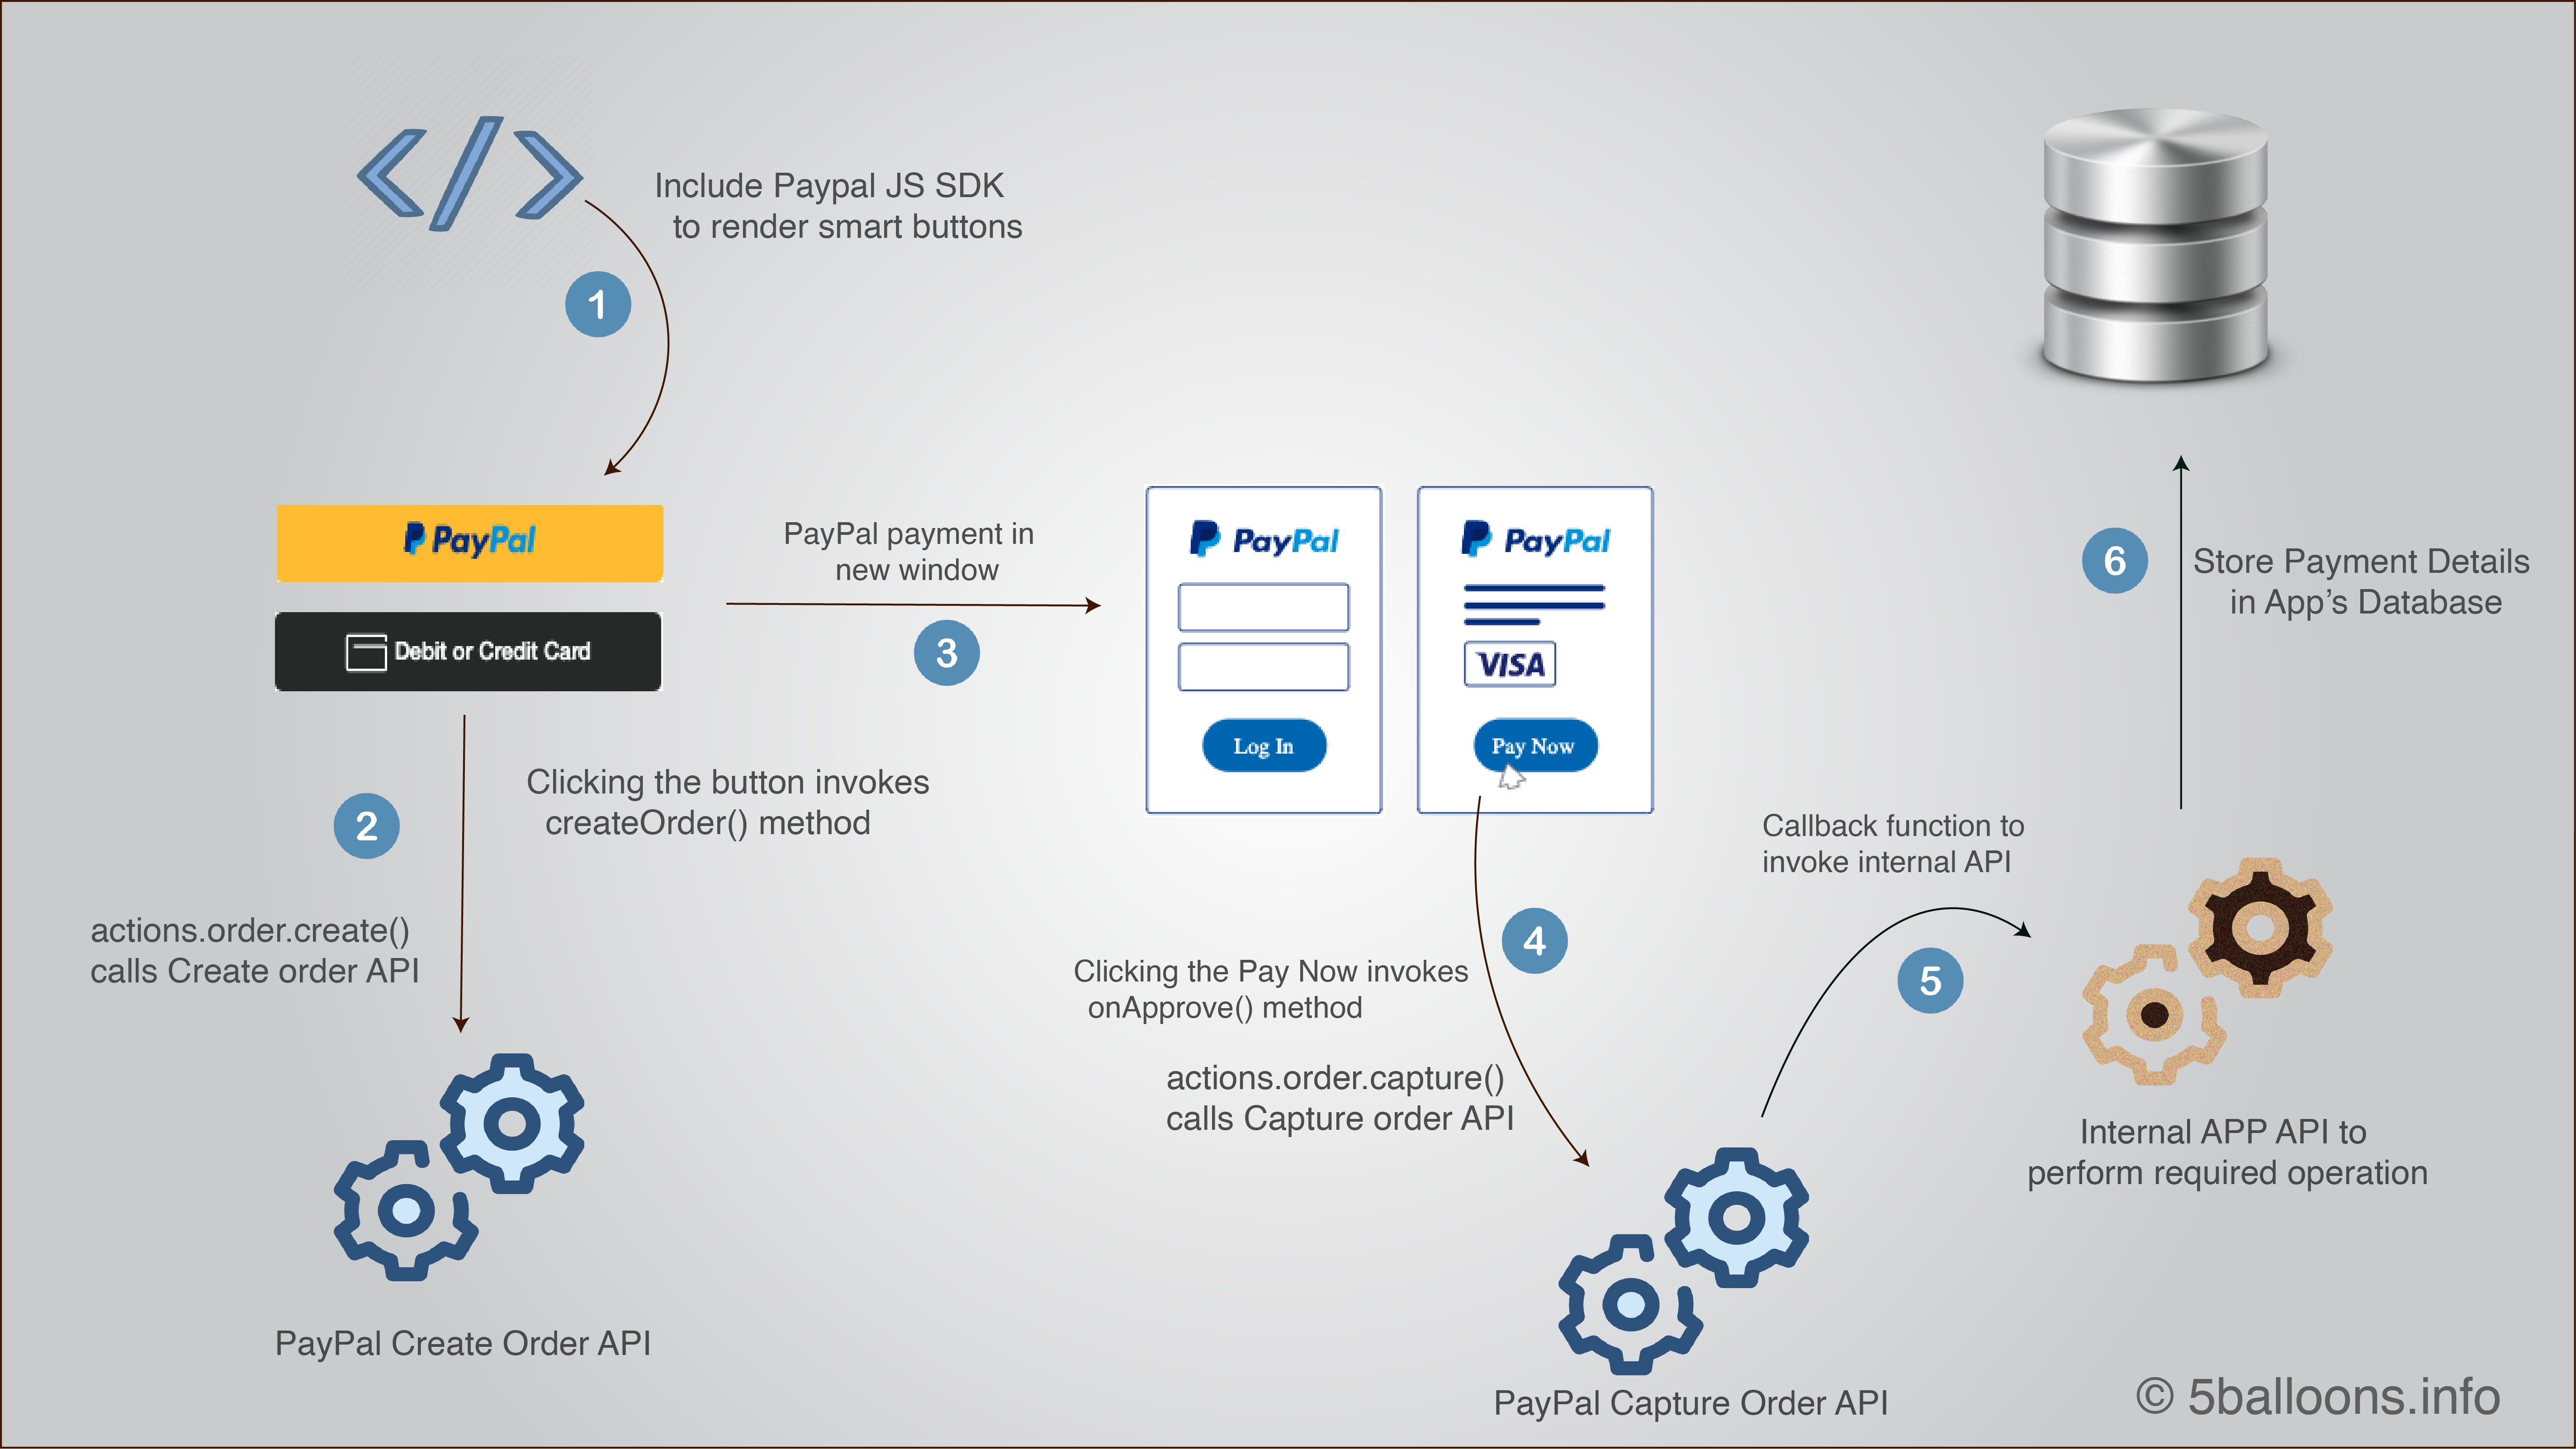
- Add the PayPal Smart Payment Buttons to your web page.
- Render the Smart Button.
- Configure Button API to send Correct Parameters to Create Order API.
- Handle a successful Payment flow.
- Handle canceled Payment flow.
Step 1: Add the PayPal Smart Payment Button to your web page.
The latest version of the PayPal API makes it very simple to add a payment button to your webpage. You just need to include the PayPal javascript SDK on your webpage.
<!DOCTYPE html>

<head>
  <meta name="viewport" content="width=device-width, initial-scale=1"> <!--
   Ensures optimal rendering on mobile devices. -->
  <meta http-equiv="X-UA-Compatible" content="IE=edge" /> <!--
Optimal Internet Explorer compatibility -->
</head>

<body>
  <script
    src="https://www.paypal.com/sdk/js?client-id=SB_CLIENT_ID"> // Required.
     Replace SB_CLIENT_ID with your sandbox client ID.
  </script>
</body>
Make sure yo change the SB_CLIENT_ID to your sandbox application client-id.
Step 2: Render the Smart Button.
We can now render the Smart Button on our webpage using the javascript SDK that we included in the last step.
Include the following script after the script that you included in the previous step.
<script>
    paypal.Buttons().render('#paypal-button-container');
    // This function displays Smart Payment Buttons on your web page.
</script>
The script renders the smart button in the div with an id of paypal-button-container. Thus include the empty div on your webpage, wherever you are looking to render the buttons.
<div id="paypal-button-container"></div>Here is how the HTML of my Bookstore looks like
<h3>My Book Store</h3>
    <div>
        <img src="/sample-pdf-book.png" width="200"/>
        <p><em>A Dummy Book Title</em></p>
        <p> <strong>Buy Now :</strong> $ 0.50</p>
    </div>
    <div style="width:200px" id="paypal-button-container"></div>
It gives the following output.

Step 3: Configure Create Order API.
As soon as the User clicks on the Smart Button, it invokes the Create Order API,
To override the default parameters that are sent to Create Order API, you need to do the following
- Implement the
createOrderfunction and on Button API. - Calls PayPal using
actions.order.create()to set up the details of a one-time transaction, including the amount, line item details, and more.
Let's see how we can do the following.
paypal.Buttons({
createOrder: function(data, actions) {
// This function sets up the details of the transaction, including the amount and line item details.
return actions.order.create({
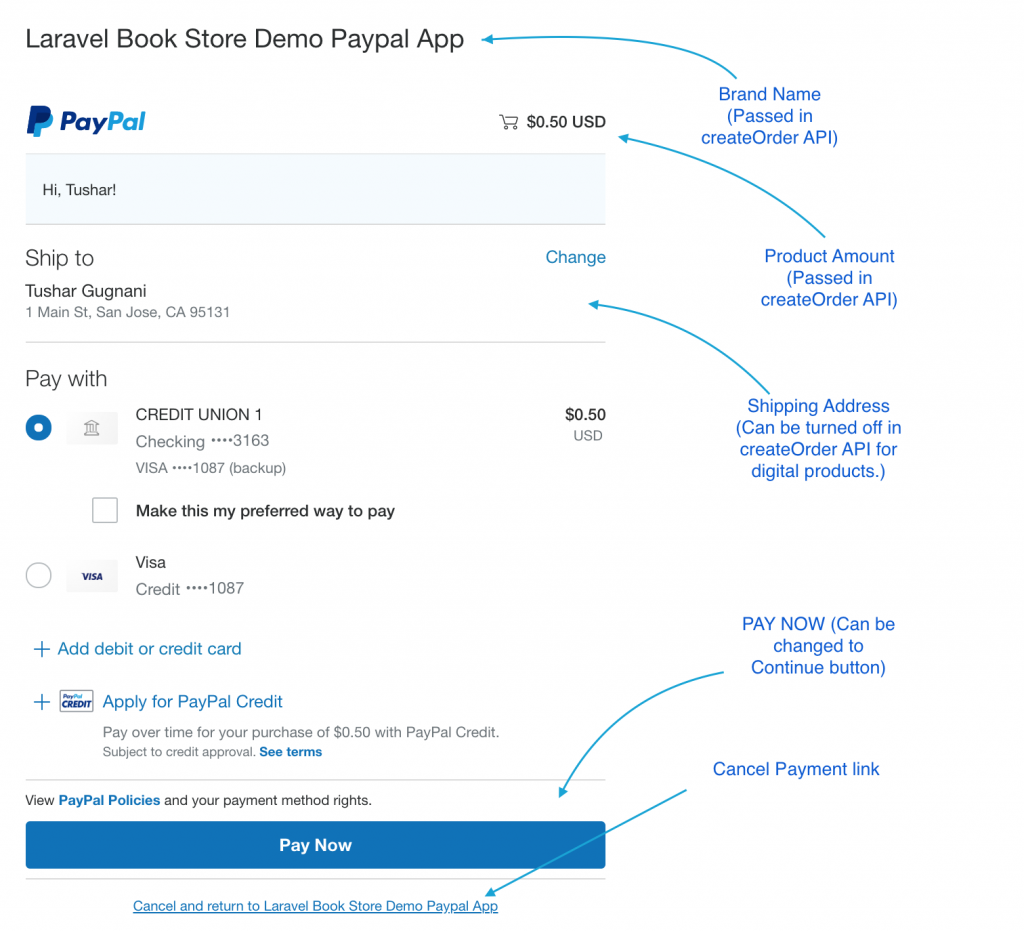
application_context: {
brand_name : 'Laravel Book Store Demo Paypal App',
user_action : 'PAY_NOW',
},
purchase_units: [{
amount: {
value: '0.50'
}
}],
});
}
}).render('#paypal-button-container');We are sending a few parameters to the create Order API, which defines the value of the item we are selling and also set's the Brand name and few other things. To check the full list of parameters that you can customize check documentation of Create Orders API.
Now, when a user clicks on the PayPal Button, It opens up a new window or a popup in where the user can make the payment.
If the user is not already logged in, he will see the login to the PayPal page.
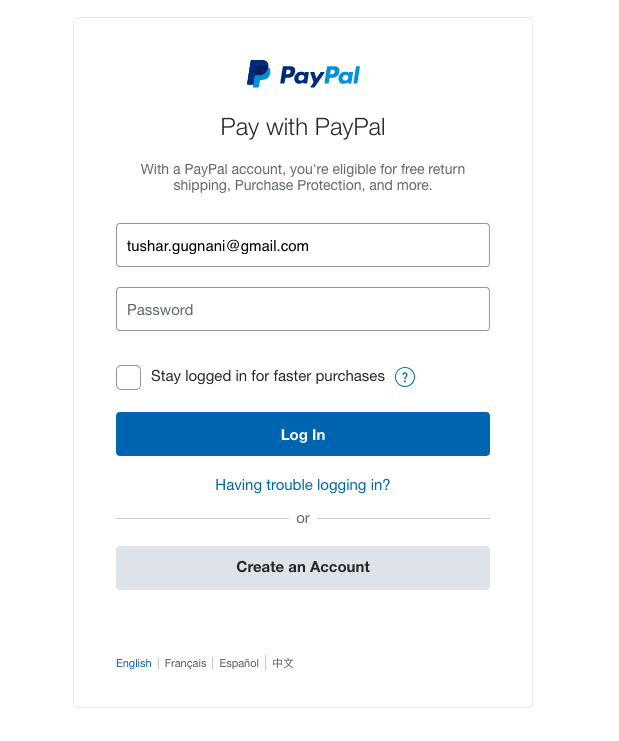
Once the user Log's in. He will see the page to make the Payment.
Users can now pay and once the payment is done the payment window will be closed, and the user is now back on the page from where the payment is done. Also, we haven't yet captured the payment, Let's handle the successful payment flow in the next step.
Step 4: Handle the successful Payment flow.
What happens when the user makes the payment, We need to capture the payment, This can be done swiftly through javascript API itself.
When user Approves the payment onApprove method is triggered and in here we can capture the payment by calling actions.order.capture() API method.
For my dummy book shop, I also want to save the captured details into my database. This can be done inside the callback function of capture API, you can call your AJAX request inside this function to save the details into your database. I am using vanilla javascript API in this example.
Here is how my onApprove function looks like
onApprove: function(data, actions) {

      let token = document.querySelector('meta[name="csrf-token"]').getAttribute('content');

      // This function captures the funds from the transaction.
      return actions.order.capture().then(function(details) {
          if(details.status == 'COMPLETED'){
            return fetch('/api/paypal-capture-payment', {
                      method: 'post',
                      headers: {
                          'content-type': 'application/json',
                          "Accept": "application/json, text-plain, */*",
                          "X-Requested-With": "XMLHttpRequest",
                          "X-CSRF-TOKEN": token
                      },
                      body: JSON.stringify({
                          orderId     : data.orderID,
                          id : details.id,
                          status: details.status,
                          payerEmail: details.payer.email_address,
                      })
                  })
                  .then(status)
                  .then(function(response){
                      // redirect to the completed page if paid
                      window.location.href = '/pay-success';
                  })
                  .catch(function(error) {
                      // redirect to failed page if internal error occurs
                      window.location.href = '/pay-failed?reason=internalFailure';
                  });
          }else{
              window.location.href = '/pay-failed?reason=failedToCapture';
          }
      });
    },
Let's understand what's going inside the onApprove function point by point.
- We first call the capture API by calling
actions.order.capture()API. - Inside its call back function, we check if the status of capture is "COMPLETE", if not we send the user to the payment failed page.
- If yes, we go ahead and call our internal API using Javascript Fetch API.
- We send a list of JSON data that is returned by the Capture API, To see the full list of what all is returned by the capture API check the details Capture Payment for Order Response
- We then check if the internal API worked by checking its status
.then(status), if not we throw the error that will be caught. - If it worked successfully we can redirect the user to a confirmation page.
Here is the status function that checks if our internal API worked.
    function status(res) {
      if (!res.ok) {
          throw new Error(res.statusText);
      }
      return res;
    }
Here is my controller function of the internal API that I am calling
    public function capturePayment(Request $request){
         $order = Order::create(['orderId' => $request->get('orderId'),
                        'status' => $request->get('status'),
                        'payerEmail' => $request->get('payerEmail')]);

        //Code to Email Book To User

        return $order;
    }
You can write any custom logic inside this function of what needs to be done once you capture the user payment.
Step 5: Handle the canceled Payment flow.
The user might choose to cancel the payment by clicking the cancel link, in that case, we will redirect the user to payment failed page.
For this, we need to implement the onCancel method.
    onCancel: function (data) {
        window.location.href = '/pay-failed?reason=userCancelled';
    }
Complete PayPal Smart Button Integration Code
Here is how my complete page looks like
<!DOCTYPE html>
<html lang="en">
<head>
    <meta charset="UTF-8">
    <meta name="viewport" content="width=device-width, initial-scale=1.0">
    <meta http-equiv="X-UA-Compatible" content="ie=edge">
    <meta name="csrf-token" content="{{ csrf_token() }}">
    <title>Document</title>
</head>
<body>
    <h3>My Book Store</h3>
    <div>
        <img src="/sample-pdf-book.png" width="200"/>
        <p><em>A Dummy Book Title</em></p>
        <p> <strong>Buy Now :</strong> $ 0.50</p>
    </div>
    <div style="width:200px" id="paypal-button-container"></div>

    <script
    src="https://www.paypal.com/sdk/js?client-id=AdttvZgAehmurmZt53u_VZusAzNjiNY6qh3-F93Cxlhy_20Tvn8rNNHPXl4KVxOtPA5wXabv002wUKV_">
    </script>

    <script>
    paypal.Buttons({
    createOrder: function(data, actions) {
      // This function sets up the details of the transaction, including the amount and line item details.
      return actions.order.create({
        application_context: {
          brand_name : 'Laravel Book Store Demo Paypal App',
          user_action : 'PAY_NOW',
        },
        purchase_units: [{
          amount: {
            value: '0.50'
          }
        }],
      });
    },

    onApprove: function(data, actions) {

      let token = document.querySelector('meta[name="csrf-token"]').getAttribute('content');

      // This function captures the funds from the transaction.
      return actions.order.capture().then(function(details) {
          if(details.status == 'COMPLETED'){
            return fetch('/api/paypal-capture-payment', {
                      method: 'post',
                      headers: {
                          'content-type': 'application/json',
                          "Accept": "application/json, text-plain, */*",
                          "X-Requested-With": "XMLHttpRequest",
                          "X-CSRF-TOKEN": token
                      },
                      body: JSON.stringify({
                          orderId     : data.orderID,
                          id : details.id,
                          status: details.status,
                          payerEmail: details.payer.email_address,
                      })
                  })
                  .then(status)
                  .then(function(response){
                      // redirect to the completed page if paid
                      window.location.href = '/pay-success';
                  })
                  .catch(function(error) {
                      // redirect to failed page if internal error occurs
                      window.location.href = '/pay-failed?reason=internalFailure';
                  });
          }else{
              window.location.href = '/pay-failed?reason=failedToCapture';
          }
      });
    },

    onCancel: function (data) {
        window.location.href = '/pay-failed?reason=userCancelled';
    }


    }).render('#paypal-button-container');
    // This function displays Smart Payment Buttons on your web page.

    function status(res) {
      if (!res.ok) {
          throw new Error(res.statusText);
      }
      return res;
    }
  </script>

</body>
</html>
There can be a lot of customization that you would want to do as per your application. But this tutorial should give an example of how to get started with implementing the PayPal Smart Payment Button in your Laravel Application.