
Send Email on Registration with Laravel
This article will show you how to send an welcome email to the user just after the registration.
Before we continue make sure you have following ready
In this article we will cover how we can send emails by generating the Mailable class and then manually creating the HTML view file which will be sent as the welcome email.
1. Setting up the email driver
Before we could start sending emails you should set your email driver in the .env file of your project. It can be either sendmail, SMTP , mailgun etc.
For the simplicity of this article , I am using a dummy mailbox (mailtrap.io) which works as a dummy SMTP mailbox for development testing.
You can set-up a new account under mailtrap.io and use its credentials in the .env file to setup the mail driver.
Something like given below.
MAIL_DRIVER=smtp
MAIL_HOST=smtp.mailtrap.io
MAIL_PORT=2525
MAIL_USERNAME=efaea9a7b1713f
MAIL_PASSWORD=a5a09892******
MAIL_ENCRYPTION=null
Note: 1. The USERNAME and PASSWORD field in the above code is dummy ( Please change it as per your SMTP :) )
2. Make sure your SMTP mail settings are set properly. Test it out by setting up a mailtrap account and sending a dummy email ( Laravel Send Email Example )
2. Generating WelcomeMail ( Mailable class )
In Laravel all the emails sent by your application must be extended by a Mailable class. To generate one such class for our welcome email on registration. Let's generate a class with artisan command.
Run the given below command in your project root
php artisan make:mail WelcomeMailAs this command is executed, A new Class named WelcomeMail.php will be generated under App/Mail. This class will have a build method which defines which view file to send as email.
<?php

namespace App\Mail;

use Illuminate\Bus\Queueable;
use Illuminate\Mail\Mailable;
use Illuminate\Queue\SerializesModels;
use Illuminate\Contracts\Queue\ShouldQueue;

class WelcomeMail extends Mailable
{
    use Queueable, SerializesModels;


    public $user;
    /**
     * Create a new message instance.
     *
     * @return void
     */
    public function __construct($user)
    {
        $this->user = $user;
    }

    /**
     * Build the message.
     *
     * @return $this
     */
    public function build()
    {
        return $this->view('emails.welcome');
    }
}
We have modified the name of view files as emails.welcome. We will create a emails folder under resources/views in which we will keep our email views. Also as you can see we have declared the $user as public and we are setting the variable in the constructor.
Whatever variables are declared as public are by default available in the view file. Thus we can directly refer to the $user variable to get the user related data directly in the view file.
3. Creating the view file
Create a new file welcome.blade.php under resources > views > emails and put following contents into it.
<!DOCTYPE html>
<html>
<head>
    <title>Welcome Email</title>
</head>

<body>
<h2>Welcome to the site {{$user['name']}}</h2>
<br/>
Your registered email-id is {{$user['email']}}
</body>

</html>
Since we have declared $user variable as public and we are passing it into our WelcomeMail class. It should be directly accessible in the view.
4. Sending Email on Registration
Since now we have generated the WelcomeMail class. We can modify our registration method to send emails. Open RegisterController.php under Http > Controllers > Auth and modify the create method as given below.
<?php

namespace App\Http\Controllers\Auth;

use ...
use .....
use App\Mail\WelcomeMail;
use Illuminate\Support\Facades\Mail;


class RegisterController extends Controller
{
    .
    ...
    ....
    protected function create(array $data)
    {
        $user =  User::create([
            'name' => $data['name'],
            'email' => $data['email'],
            'password' => bcrypt($data['password']),
        ]);

        Mail::to($data['email'])->send(new WelcomeMail($user));

        return $user;
    }
}
Note: (Make sure to import the required classes Mail Facade and WelcomeMail)
Here we are using the Mail facade to send the email. An instance of newly created user is sent to the WelcomeMail
That's It ! Send Email on Registration with Laravel Functionality should work just fine.
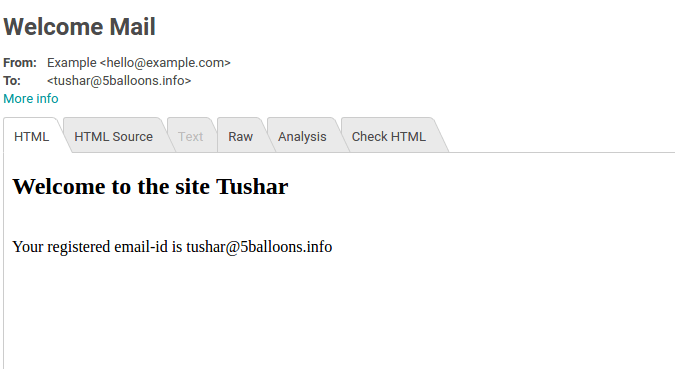
As I am using mailtrap, this is what I receive in its inbox.
You will find following tutorials helpful, once you have implemented send email functionality after registration.
- Email Verification and account activation after Registration with Laravel 5.5 Authentication
- Change Password Functionality with Laravel 5.5 Authentication