<form action="your-server-side-code" method="POST">
  <script
    src="https://checkout.stripe.com/checkout.js" class="stripe-button"
    data-key="pk_test_GFTyo5v7WVZXXv5rBMiByuee"
    data-amount="999"
    data-name="YourCompany Test"
    data-description="Example charge"
    data-image="https://stripe.com/img/documentation/checkout/marketplace.png"
    data-locale="auto">
  </script>
</form> Clicking on this button opens up a iFrame , where user can enter the payment information like Email, Card-Number, CVC, Expiry Date etc. Here is how the iframe modal looks like.
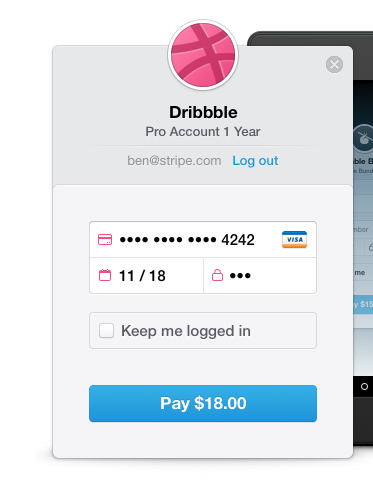
Note: This is how the default checkout modal looks, you may have extra fields enabled like zip code depending upon the data configuration in your script.
Let's get into the Dusk Automation Part.
Since stripe checkout involves opening of an iFrame and putting data into it. We need to make dusk handle to switch into the iFrame before it starts filling out the data.
Dusk Test Code
/** @test */
public function it_asserts_that_user_can_pay_via_stripe(){
    $this->browse(function ($browser) {
        $browser->visit('/payment/page')
                ->assertSee('Pay with Card')
                ->press('Pay with Card')
                ->waitFor('iframe[name=stripe_checkout_app]')
                ->withinFrame('iframe[name=stripe_checkout_app]', function($browser){
                   $browser->pause(2000);
                   $browser->keys('input[placeholder="Email"]', 'your.email@gmail.com')
                       ->keys('input[placeholder="Card number"]', '4242 4242 4242 4242')
                       ->keys('input[placeholder="MM / YY"]', '0122')
                       ->keys('input[placeholder="CVC"]', '123')
                       ->press('button[type="submit"')
                       ->waitUntilMissing('iframe[name=stripe_checkout_app]');
            });
    });
}->waitFor('iframe[name=stripe_checkout_app]')waitFor method makes sure that we proceed only when the iframe is opened.
->withinFrame('iframe[name=stripe_checkout_app]', function($browser){withinFrame is a great method provided by Laravel Dusk, This method switches the automation driver to the iFrame, performs the callback function code within the iFrame and then brings the driver to default window. withinFrame utilizes driver function switchTo ( $this->driver->switchTo()->frame($selector) ) to perform the switching.
Next, before filling out the payment information. I have given a pause(2000) of 2 seconds. This is because there were certain times driver started typing into the field before they appeared on the screen. Thus to make sure we have all the fields visible, I have added a pause before it starts filling details.
Next up we start putting data into the form fields.
$browser->keys('input[placeholder="Email"]', 'your.email@gmail.com')press('button[type="submit"'), and wait for the iFrame to vanish waitUntilMissing('iframe[name=stripe_checkout_app]');
There you go. Automating Stripe Checkout Payments with Laravel Dusk.