This is the
Step 11 of Tutorial
How to Convert Bootstrap 4 Templates to Wordpress Themes . In this step we will convert the Contact Me Section of the static template into Dynamic wordpress theme.
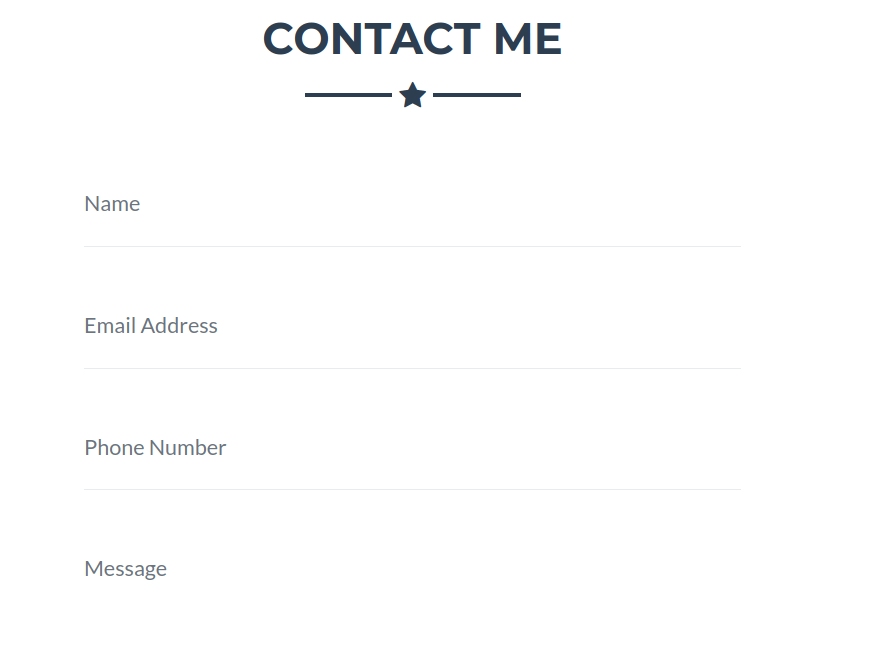
This is how the contact form looks in our static bootstrap template. We will convert this into dynamic so that the contact me functionality sends an email to the website owner's email. We will use a plugin called
Contact Form 7
# Install and Activate Contact Form 7 Plugin
Go to your
wordpress dashboard ->
Plugins ->
Add New
Search for
Contact Form 7
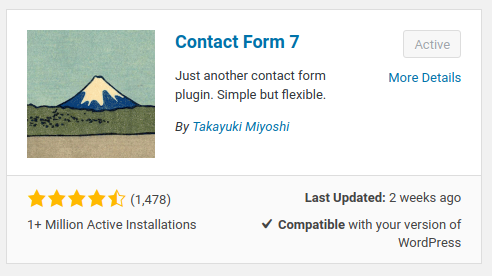
Click
Install and
Activate the Plugin
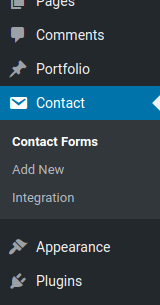
Once the Plugin is installed, you should see a new menu in your wordpress dashboard named
Contact.
# Add New Form in Contact Form 7
Select the Contact Menu Item and click Add New
Give your form a Title "Freelancer Form" and put the following code in the form code.
<div class="control-group">
      <div class="form-group floating-label-form-group controls mb-0 pb-2">
            <label>Name</label>
            [text* your-name id:name class:form-control placeholder "Name"]
            <p class="help-block text-danger"></p>
      </div>
 </div>
<div class="control-group">
       <div class="form-group floating-label-form-group controls mb-0 pb-2">
            <label>Email Address</label>
             [email* your-email id:email class:form-control placeholder "Email Address"]
             <p class="help-block text-danger"></p>
       </div>
</div>
 <div class="control-group">
        <div class="form-group floating-label-form-group controls mb-0 pb-2">
            <label>Phone Number</label>
            [tel* your-tel id:phone class:form-control placeholder "Phone Number"]
            <p class="help-block text-danger"></p>
         </div>
</div>
<div class="control-group">
         <div class="form-group floating-label-form-group controls mb-0 pb-2">
             <label>Message</label>
              [textarea* your-message id:message class:form-control 10x5 placeholder "Message"]
              <p class="help-block text-danger"></p>
          </div>
</div>
<br>
<div id="success"></div>
<div class="form-group">
     [submit id:sendMessageButton class:btn class:btn-primary class:btn-xl "Send"]
</div>
If you notice closely, we have pasted our static template form, but we have replaced the html form fields with Contact Form 7 plugin fields. This is how contact form understands a text box
[text* your-name id:name class:form-control placeholder "Name"] and same applies to other form field as well.
Click on
Save.
This will generate a shortcode for the form you just generated , something like.
[contact-form-7 id="28" title="Contact Form Freelancer"]
Your form id can be different from he id which got generated for me.
We can now use this shortcode to be used in our contact form section. Go ahead and paste this below code just below your about section in
page-home.php
    <!-- Contact Section -->
    <section id="contact">
        <div class="container">
            <h2 class="text-center text-uppercase text-secondary mb-0">Contact Me</h2>
            <hr class="star-dark mb-5">
            <div class="row">
                <div class="col-lg-8 mx-auto">
                    <!-- To configure the contact form email address, go to mail/contact_me.php and update the email address in the PHP file on line 19. -->
                    <!-- The form should work on most web servers, but if the form is not working you may need to configure your web server differently. -->
                        <?php echo do_shortcode( '[contact-form-7 id="28" title="Contact Form Freelancer"]') ?>
                </div>
            </div>
        </div>
    </section>
The mail settings can be done via going into the Mail tab while adding the new Contact Form.
That's it , once you refresh you should see the contact form. And if you have done your mail settings correctly, submitting the contact form with proper information should send a mail to the specified mail address.
You are almost there, In the last
Step 12 we will convert our Footer Section into Dynamic