This is the
Step 6 of Tutorial
How to Convert Bootstrap 4 Templates into Wordpress Themes . In this step we will convert our static Bootstrap Navigation into a dynamic Wordpress menu.
Let's Begin
The current Bootstrap navigation in our static template is just below the
<body> tag of your index.php file and the HTML code looks something like below.
    <!-- Navigation -->
    <nav class="navbar navbar-expand-lg bg-secondary fixed-top text-uppercase" id="mainNav">
      <div class="container">
        <a class="navbar-brand js-scroll-trigger" href="#page-top">Tushar Gugnani</a>
        <button class="navbar-toggler navbar-toggler-right text-uppercase bg-primary text-white rounded" type="button" data-toggle="collapse" data-target="#navbarResponsive" aria-controls="navbarResponsive" aria-expanded="false" aria-label="Toggle navigation">
          Menu
          <i class="fa fa-bars"></i>
        </button>
        <div class="collapse navbar-collapse" id="navbarResponsive">
          <ul class="navbar-nav ml-auto">
            <li class="nav-item mx-0 mx-lg-1">
              <a class="nav-link py-3 px-0 px-lg-3 rounded js-scroll-trigger" href="#portfolio">Portfolio</a>
            </li>
            <li class="nav-item mx-0 mx-lg-1">
              <a class="nav-link py-3 px-0 px-lg-3 rounded js-scroll-trigger" href="#about">About</a>
            </li>
            <li class="nav-item mx-0 mx-lg-1">
              <a class="nav-link py-3 px-0 px-lg-3 rounded js-scroll-trigger" href="#contact">Contact</a>
            </li>
          </ul>
        </div>
      </div>
    </nav>
If you paste this code in your Wordpress theme
header.php file under
<body> tag, the navigation will look perfectly fine.
But since we want the ability to change the menu directly from our Wordpress dashboard and to not edit the php files every time we make changes to our menu.
We will convert this menu into
dynamic.
# 1 Modify Menu from Wordpress Dashboard
Go to your wordpress dashboard.
Click on
Appearance >
Menus
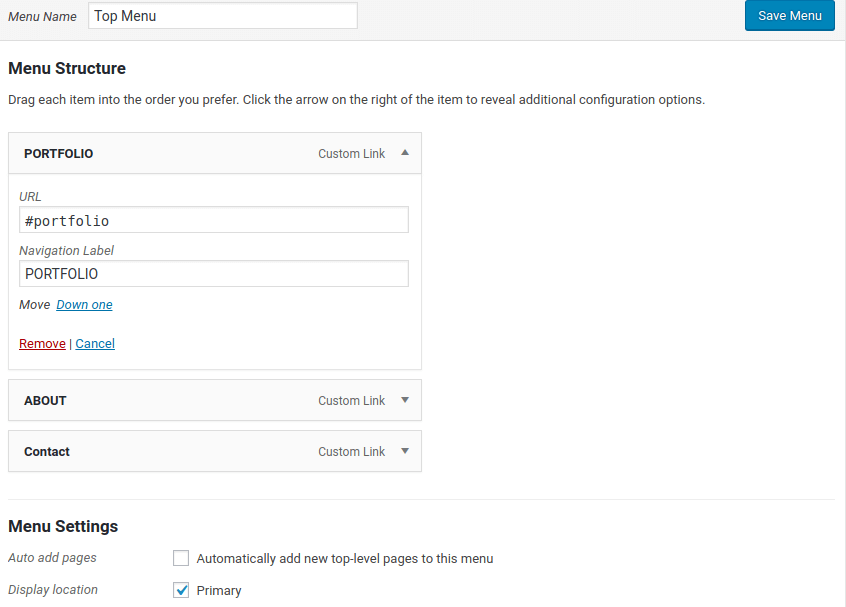
You will see a default Menu in this page. Remove "Sample Page" link from this menu. Start adding custom links to this Menu
- Link Test : Portfolio , URL : #portfolio
- Link Test : About , URL : #about
- Link Test : Contact , URL : #contact
Under the Menu Settings, Display Location -> Select
Primary.
Click
Save Menu
# 2 Add bs4navwalker.php
bs4navwalker.php is a script that helps us to correctly define a dynamic menu in wordpress using
wp_nav_menu function.
Grab the latest bs4navwaler.php from
dupkey/bs4navwalker . Save the bs4navwalker.php file in your theme root directory.
Open
functions.php file in your editor. This file is located at the project root of the theme directory.
Add the following require function, just above the
themename_setup() function.
require_once('bs4navwalker.php');
# 3 Add Custom Menu
Next, let's create a dynamic menu in our theme.
Open
header.php file in your editor, and add the following code just below the
<body> tag.
    <!-- Navigation -->
    <nav class="navbar navbar-expand-lg bg-secondary fixed-top text-uppercase" id="mainNav">
        <div class="container">
            <a class="navbar-brand js-scroll-trigger" href="#page-top"><?php bloginfo('name'); ?></a>
            <button class="navbar-toggler navbar-toggler-right text-uppercase bg-primary text-white rounded" type="button" data-toggle="collapse" data-target="#navbarResponsive" aria-controls="navbarResponsive" aria-expanded="false" aria-label="Toggle navigation">
                Menu
                <i class="fa fa-bars"></i>
            </button>
            <?php
            wp_nav_menu([
                'menu'            => 'primary',
                'theme_location'  => 'menu-1',
                'container'       => 'div',
                'container_id'    => 'navbarResponsive',
                'container_class' => 'collapse navbar-collapse',
                'menu_id'         => false,
                'menu_class'      => 'navbar-nav ml-auto',
                'depth'           => 0,
                'fallback_cb'     => 'bs4navwalker::fallback',
                'walker'          => new bs4navwalker()
            ]);
            ?>
        </div>
    </nav>
To explain the above code,
wp_nav_menu will fetch the contents of menu we created on the wordpress dashboard. For this we need to provide some parameters to
wp_nav_menu. Parameters determine which menu contents needs to be fetched, and how the menu should be formed in HTML once the contents are fetched.
Most of the parameters of
wp_nav_menu are self explanatory. If you are looking for more details for a parameter, visit the official documentation of
wp_nav_menu
If you visit your website home page now, you should be able to see the menu. But it's not exactly how is should look like.
For this you need to add classes to
<li> and
<a> tag of the menu. This cannot be achieved with
wp_nav_menu function.
# 4 Add Custom Classes to List and Anchor tag of Wordpress Menu.
To add custom class to list
<li> tag elements of our wordpress menu.
Go to
Appearance >
Menus >
On the top of the page, you will see a
Screen Options button, Click on that and check
CSS classes checkbox.

Once this option is checked, you should see a new text box in your menu items, where you can add your custom css class to the list elements.
Add
nav-item mx-0 mx-lg-1 class for all your menu items.

To add custom class to anchor
<a> tag elements of our wordpress menu.
Open your
functions.php file , which is located in wordpress theme root directory and add following code at the bottom of the file.
function add_menuclass($ulclass) {
    return preg_replace('/<a/', '<a class="nav-link py-3 px-0 px-lg-3 rounded js-scroll-trigger"', $ulclass, -1);
}
add_filter('wp_nav_menu','add_menuclass');
Refresh your website's home page, and you should see your Bootstrap Static Navigation turned into Dynamic Wordpress Menu.
Now you can change this menu directly form wordpress dashboard, instead of editing html code.
Great , Let's move to
Step 7 : Remove the unwanted code from Underscores theme