
The form is an integral part of any web application, in this post we will learn how we bind different input fields of an HTML form with VueJS data properties.
Here is an example form that we are building in this example.
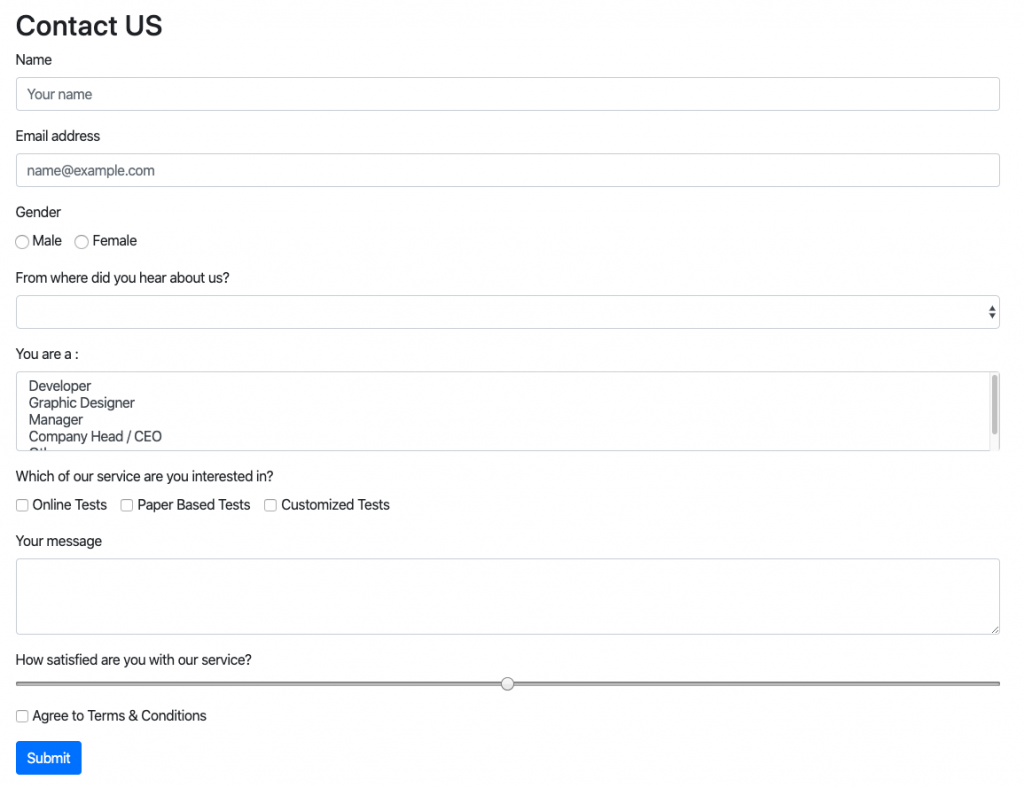
This is a dummy contact form and I have tried to include all the possible input fields in this form for the demonstration.
Setting Up
For this example, we have used the basic HTML:5 markup and have used the VueJS library script on the page. To make the form look pretty we have also included the Bootstrap-4 css on our page.
<!DOCTYPE html>
<html lang="en">
<head>
    <meta charset="UTF-8">
    <meta name="viewport" content="width=device-width, initial-scale=1.0">
    <title>Document</title>
    <link rel="stylesheet" href="https://stackpath.bootstrapcdn.com/bootstrap/4.4.1/css/bootstrap.min.css" integrity="sha384-Vkoo8x4CGsO3+Hhxv8T/Q5PaXtkKtu6ug5TOeNV6gBiFeWPGFN9MuhOf23Q9Ifjh" crossorigin="anonymous">

    <!-- development version, includes helpful console warnings -->
    <script src="https://cdn.jsdelivr.net/npm/vue/dist/vue.js"></script>
</head>
<body class="container">
    <div class="row">
        <div class="col-lg-12">
            <div id="app">
                <br/>
                <h2> Contact US </h2>
                <form>

                </form>


            </div>
        </div>
    </div>
</body>
</html>
Here is how our Vue Instance looks like
    var app = new Vue({
        el: '#app',
        data: {
            form:{
            }
        }
    });
We have defined a Vue Instance that is attached to div with an id of app, Inside the Vue Instance, we have defined an object property with the name form. Even though we can define all the form fields as individual properties inside the data object, we are using a form object to keep all the form related properties together, for better presentation and cleaner code.
Just below the HTML form to test the reactivity and two-way binding. I have this code.
                <div class="column">
                    <section class="section" id="results">
                      <div class="box alert alert-secondary">
                        <ul>
                          <!-- loop through all the `form` properties and show their values -->
                          <li v-for="(item, k) in form">
                            <strong>{{ k }}:</strong> {{ item }}
                          </li>
                        </ul>
                      </div>
                    </section>
                  </div>
This code snippet uses the v-for loop to loop through the list of form values and show their reactive values.
Vue has provided a directive that makes it very simple to bind data properties to form input fields. Let's start binding each of the input fields one by one.
Binding Text Field
You can bind the text field of the form to a Vue JS data property using v-model directive.
<div class="form-group">
    <label for="name">Name</label>
    <input type="text" class="form-control" id="name" placeholder="Your name" v-model="form.name">
</div>

<script>
    var app = new Vue({
        el: '#app',
        data: {
            form:{
                name: '',
            }
        }
    });
</script>
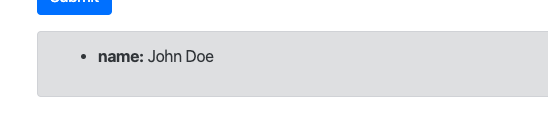
We have defined a new field in our form object named name with a default blank value, and we have used the property form.name in the v-model directive in our text input field.
This will provide two-way data-binding. If you are following along, you should see a new property name in the box that we printed below the form and as you change the value of input field name, It should show the value typed.
Binding Email Field
Next in our form is the input field of type email, Similar to the text field, binding an email field involves putting a v-model directive on the input field, and we'll add the new data property inside our form object.
<div class="form-group">
    <label for="email">Email address</label>
    <input type="email" class="form-control" id="email" placeholder="name@example.com" v-model="form.email">
</div>

<script>
    var app = new Vue({
        el: '#app',
        data: {
            form:{
                name: '',
                email: '',
            }
        }
    });
</script>
Binding Radio Buttons
The next input element in our form is the Gender field with two radio button options, male and female.
<div class="form-group">
    <label for="formControlRange">Gender</label><br/>
        <div class="form-check form-check-inline">
        <input class="form-check-input" type="radio" name="gender" id="gender-male" value="male" v-model="form.gender">
        <label class="form-check-label" for="gender">Male</label>
      </div>
      <div class="form-check form-check-inline">
        <input class="form-check-input" type="radio" name="gender" id="gender-female" value="female" v-model="form.gender">
        <label class="form-check-label" for="gender">Female</label>
      </div>
</div>

<script>
    var app = new Vue({
        el: '#app',
        data: {
            form:{
                name: '',
                email: '',
                gender: '',
            }
        }
    });
</script>
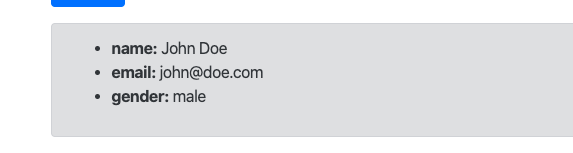
We have used the v-model directive of the same value form.gender on both of the radio buttons, and VueJS is smart enough to recognize which value the user has selected and assigned the value of that radio button to the data property.
Binding Select Box
The v-model directive can easily be used into select box as well, VueJS will assign the user-selected value of the selected option to the property bound with the select box.
<div class="form-group">
    <label for="refer">From where did you hear about us?</label>
    <select name="refer" class="form-control" id="refre" v-model="form.refer">
        <option value="website">Website</option>
        <option value="newspaper">Newspaper</option>
        <option value="friend">Friend</option>
        <option value="online-ad">Online Ad</option>
        <option value="other">Other</option>
    </select>
</div>

<script>
    var app = new Vue({
        el: '#app',
        data: {
            form:{
                name: '',
                email: '',
                gender: '',
                refer: '',
            }
        }
    });
</script>
Binding Multi Select Box
As the name suggests, you can select multiple values with a multi-select box.
<div class="form-group">
    <label for="exampleFormControlSelect2">You are a : </label>
    <select multiple class="form-control" id="exampleFormControlSelect2" v-model="form.profession">
        <option value="developer">Developer</option>
        <option value="designer">Graphic Designer</option>
        <option value="manager">Manager</option>
        <option value="ceo">Company Head / CEO</option>
        <option value="other">Other</option>
    </select>
</div>

<script>
    var app = new Vue({
        el: '#app',
        data: {
            form:{
                name: '',
                email: '',
                gender: '',
                refer: '',
                profession: [],
            }
        }
    });
</script>
We have used the v-model directive on the select box to bind it with property inside the form object. Notice that we defined the profession property as an array because it's supposed to contain multiple values.
Note: If you bind a normal variable instead of an Array to multiple select boxes, VueJS is smart enough to convert that variable into an array variable. But for the code clarity and better presentation, it's always better to define the variable as an Array.
Binding Multiple Check Boxes
Same as multiple select box, To bind the VueJS data property to multiple checkboxes, we will define the data property as an Array.
<div class="form-group">
    <label for="formControlRange">Which of our service are you interested in?</label><br/>
    <div class="form-check form-check-inline">
        <input class="form-check-input" type="checkbox" id="inlineCheckbox1" value="online" v-model="form.interested">
        <label class="form-check-label" for="inlineCheckbox1">Online Tests</label>
      </div>
      <div class="form-check form-check-inline">
        <input class="form-check-input" type="checkbox" id="inlineCheckbox2" value="paper" v-model="form.interested">
        <label class="form-check-label" for="inlineCheckbox2">Paper Based Tests</label>
      </div>
      <div class="form-check form-check-inline">
        <input class="form-check-input" type="checkbox" id="inlineCheckbox3" value="customized" v-model="form.interested">
        <label class="form-check-label" for="inlineCheckbox3">Customized Tests</label>
      </div>
</div>

<script>
    var app = new Vue({
        el: '#app',
        data: {
            form:{
                name: '',
                email: '',
                gender: '',
                refer: '',
                profession: [],
                interested: [],
            }
        }
    });
</script>
On all the input checkboxes we have used the v-model directive with the same value of data property form.interested. The values of the selected checkbox will be stored in the array.
Binding TextArea
Next up, We have a textarea in our form. Similar to the text input, put the v-model directive on the textarea input to bind it to the Vue Instance data property.
<div class="form-group">
    <label for="message">Your message</label>
    <textarea name="message" class="form-control" id="message" rows="3" v-model="form.message"></textarea>
</div>

<script>
    var app = new Vue({
        el: '#app',
        data: {
            form:{
                name: '',
                email: '',
                gender: '',
                refer: '',
                profession: [],
                interested: [],
                message: '',
            }
        }
    });
</script>
Note: It’s important to note that interpolation in textarea — <textarea>{{ form.message}}</textarea> — will not work for two-way binding. Use the v-model directive instead.
Binding Range Input
Next up in our form we have an input field of type range. Where the user can slide the bar and select the appropriate value.
<div class="form-group">
    <label for="satisfaction">How satisfied are you with our service?</label>
    <input type="range" name="satisfaction" class="form-control-range" id="formControlRange" min="0" max="10" v-model="form.satisfaction">
</div>

<script>
    var app = new Vue({
        el: '#app',
        data: {
            form:{
                name: '',
                email: '',
                gender: '',
                refer: '',
                profession: [],
                interested: [],
                message: '',
                satisfaction: '',
            }
        }
    });
</script>
We have used the v-model property to bind the range input, sliding the bar on the input field will set the data property form.satisfaction in VueJS Instance.
Binding Single Checbox
The last field in our form is a single checkbox, as opposed to the multiple checkbox to bind a single checkbox we will define a boolean value in our VueJS Instance.
<div class="form-group">
    <div class="form-check form-check-inline">
        <input class="form-check-input" type="checkbox" id="terms" value="yes" v-model="form.terms">
        <label class="form-check-label" for="inlineCheckbox3">Agree to Terms & Conditions</label>
    </div>
</div>

<script>
    var app = new Vue({
        el: '#app',
        data: {
            form:{
                name: '',
                email: '',
                gender: '',
                refer: '',
                profession: [],
                interested: [],
                message: '',
                satisfaction: '',
                terms: false
            }
        }
    });
</script>
We have defined the default value of terms property to be false, thus the checkbox will not be selected by default. As the user selects the checkbox the value will change to true.
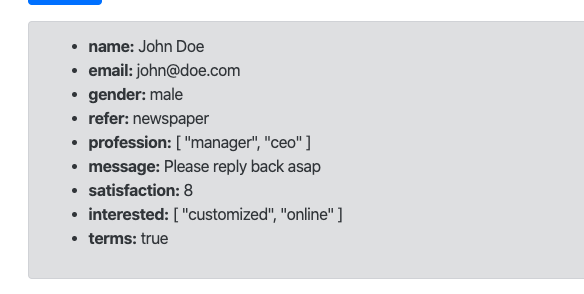
Once All the form values are selected you should see the output box below the form showing all the user-selected values.
Form submission
As the last step, let's see how we can submit the form details.
We will make use of submit event handler on the form, Also we will plug in the prevent modifier to prevent the default action of the form submission, which in this is the case will be refreshing the same URL as we haven't specified the action attribute in our form.
...
<form v-on:submit.prevent="formSubmit">
    ...
    <div class="form-group">
        <button class="btn btn-primary">Submit</button>
    </div>
</form>
...

<script type="text/javascript">
    var app = new Vue({
        ...
        methods:{
            formSubmit: function(event){
                console.log(this.form);
                event.target.reset();
            }
        }
        ...
    });
</script>
We have defined a new method name formSubmit, inside which we are simply outputting the form data values in the console log.
To clear the form input data after the user submits the form. We have used event.target.reset(), here event is the form submit and the target is the form, by calling the reset function it will clear all the filled details from form input fields.