
In this tutorial let's built a simple Shopping list App in VueJS.
Let's build a simple shopping list App where the user can add a new item to the list and can check the items which he has brought.
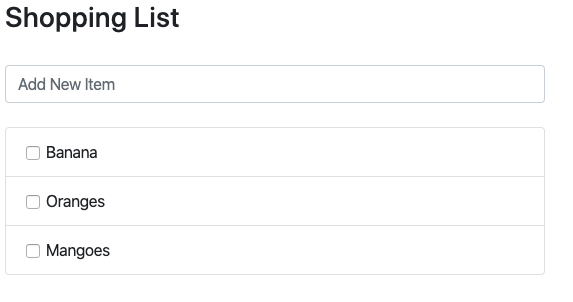
Here is how the app looks like
Let's build it step by step.
Rendering the list of Shopping Items
As a first step, let's create a Vue Instance with some initial items in the shopping list and loop through the list in our HTML to display them in the list format.
<ul class="list-group">
    <li class="list-group-item" v-for="item in items" >
              {{item}}
    </li>
</ul>
...
...
let app = new Vue({
    el : '#app',
    data:{
        items: ['Banana', 'Oranges', 'Mangoes'],
    },
});
We have a Vue instance that mounts to the div with an id of the app, and in the data, we have an array of items.
In the HTML using v-for directive, we loop through the list of items and put them in a list tag of HTML. Very Basic Stuff!
Check and Uncheck Shopping List Items.
As the next step, let's add the checkbox to each of the shopping items. As the user checks the checkbox that means that the item has been brought and now can be struck through.
To achieve this behavior lets slightly modify our items array by changing our string items and transforming them into the objects with two properties, text and checked (to reflect the state), and let's modify the HTML markup to add a checkbox to each item.
So our VueJS code for the data declaration will look like the following :
let app = new Vue({
    el : '#app',
    data:{
        items: [
            {text : 'Banana', checked : false},
            {text : 'Oranges', checked : false},
            {text : 'Mangoes', checked : false},
        ],
    }
});
And our list markup will look like this
<ul class="list-group">
    <li class="list-group-item" v-for="item in items" :class="{'removed' : item.checked}">
        <div class="form-check">
            <input class="form-check-input" type="checkbox" value="" v-model="item.checked">
            <label class="form-check-label" for="defaultCheck1">
              {{item.text}}
            </label>
          </div>
    </li>
</ul>
We have used v-model directive to bind the checkbox element to the checked property of the item object.
Also, note that we are using shorthand for v-bind to add a removed class to the list element if the checkbox is checked.
Next Up, add the following CSS styling inside the head element of your page.
        .removed {
            color: gray;
        }

        .removed label {
            text-decoration: line-through;
        }
With this, when you check any item from the list it will turn the color of text into gray and will also add line-through property to the list item marking it as completed.

Adding new Shopping List items
So now we just need a small addition to our code to be able to actually add shopping list items. To achieve that, we will add one more property to our data object and call it newItem. And introduce.a new input element into our HTML markup and bind this to the newItem property.
<input class="form-control" v-model="newItem" name="newItem" placeholder="Add New Item" @keyup.enter="addItem" />We'll also add a small method that pushed new items to the items array. And we will call this method using the shorthand @ of v-on directive used on the HTML input element. The method is set to be invoked on keyup event on the Enter key.
   let app = new Vue({
        el : '#app',
        data:{
            items: [
                {text : 'Banana', checked : false},
                {text : 'Oranges', checked : false},
                {text : 'Mangoes', checked : false},
            ],
            newItem: '',
        },
        methods: {
            addItem() {
                var text;

                text = this.newItem.trim();
                if(text){
                    this.items.push({text: this.newItem, checked: false});
                    this.newItem = ''
                }
            }
        }
   });
We added a new property to the data object called newItem. Then we added a new section called methods to our Vue Instance and added the addItem method to this section. All the data properties are accessible in the methods section via the this keyword.
[WP-Coder id="10"]
That's all about a simple shopping list in VueJS.