
Laravel comes with a out of box authentication feature. It works perfect to handle basic Authentication features like Login, Logout, Registration etc. In this article we will make use of Laravel Authentication and will demonstrate how to upload a profile picture Avatar in Laravel 5 Authentication.
Before we jump into the steps. Make sure you have following ready
- Laravel Installation on your system.
- Laravel Basic Authentication Setup
- Project Connected to a database
Ready? Sweet ! Let's get started with the demonstration.
I am using Laravel 5.6 for this demo. This should work fine with other Laravel versions as well including (5.4 , 5.5 )
Database Column to store Avatars
Let's start by preparing our database to store avatar image information. Laravel Authentication comes with a default set of database tables and migrations.
We will add a new column to our users table.
Open create_users_table.php which is located under database > migrations and add a new column named avatar with a default value of user.jpg
$table->string('avatar')->default('user.jpg');With this change the up() function of your create_users_table file will look something like below
    public function up()
    {
        Schema::create('users', function (Blueprint $table) {
            $table->increments('id');
            $table->string('name');
            $table->string('email')->unique();
            $table->string('password');
            $table->string('avatar')->default('user.jpg');
            $table->rememberToken();
            $table->timestamps();
        });
    }
We are ready of refresh our migrations.
Navigate to project root folder in your terminal and run the following command.
php artisan migrate:refreshSetup User Profile Page
In this step we will setup a user profile page from where they can make changes to the profile picture. This will include a link to profile page, an entry in the route file, a corresponding controller method and a view file.
Let's get this done, one by one.
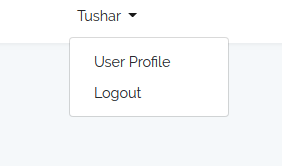
Add following link to the user /profile page in your app.blade.php file which is located in resources > views > layouts directory.
                                <div class="dropdown-menu" aria-labelledby="navbarDropdown">
                                    <a class="dropdown-item" href="/profile">
                                        User Profile
                                    </a>
                                    <a class="dropdown-item" href="{{ route('logout') }}"
                                       onclick="event.preventDefault();
                                                     document.getElementById('logout-form').submit();">
                                        {{ __('Logout') }}
                                    </a>

                                    <form id="logout-form" action="{{ route('logout') }}" method="POST" style="display: none;">
                                        @csrf
                                    </form>
                                </div>
We have added a /profile link inside div with class dropdown-menu
Next, Add the following route entry to your web.php file located under routes directory.
Route::get('profile', 'UserController@profile');Create a new controller file called UserController.php under app > Http > Controllers directory. We will add the corresponding method to handle the GET route request.
    public function profile()
    {
        $user = Auth::user();
        return view('profile',compact('user',$user));
    }
Finally, a view file where user can see his current profile picture and also change it. Go ahead and create a new file profile.blade.php under resources > views directory.
@extends('layouts.app')
@section('content')
<div class="container">
<div class="row">
@if ($message = Session::get('success'))
<div class="alert alert-success alert-block">
<button type="button" class="close" data-dismiss="alert">×</button>
<strong>{{ $message }}</strong>
</div>
@endif
@if (count($errors) > 0)
<div class="alert alert-danger">
<strong>Whoops!</strong> There were some problems with your input.<br><br>
<ul>
@foreach ($errors->all() as $error)
<li>{{ $error }}</li>
@endforeach
</ul>
</div>
@endif
</div>
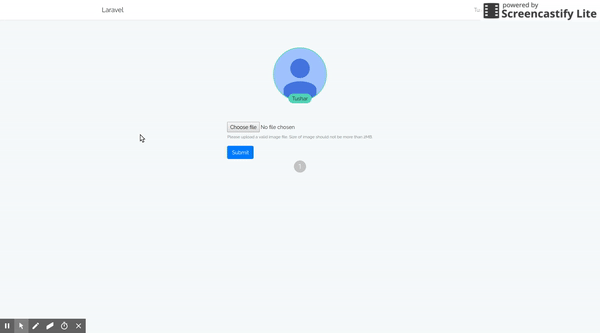
<div class="row justify-content-center">
<div class="profile-header-container">
<div class="profile-header-img">
<img class="rounded-circle" src="/storage/avatars/{{ $user->avatar }}" />
<!-- badge -->
<div class="rank-label-container">
<span class="label label-default rank-label">{{$user->name}}</span>
</div>
</div>
</div>
</div>
<div class="row justify-content-center">
<form action="/profile" method="post" enctype="multipart/form-data">
@csrf
<div class="form-group">
<input type="file" class="form-control-file" name="avatar" id="avatarFile" aria-describedby="fileHelp">
<small id="fileHelp" class="form-text text-muted">Please upload a valid image file. Size of image should not be more than 2MB.</small>
</div>
<button type="submit" class="btn btn-primary">Submit</button>
</form>
</div>
</div>
@endsection
This view file contains following.
- Logic to show success message to user on successful profile picture upload.
- To show Error message on profile picture update validation failure.
- Show current profile picture.
- Form to upload or change the profile picture.
Handle Profile Picture Upload Request
Next, we are ready to handle the POST request from the profile picture upload form. Let's do that.
Create a new entry in route file for the POST request.
Route::post('profile', 'UserController@update_avatar');
Next, we will create a corresponding controller method on UserController.php which will handle the POST request.
    public function update_avatar(Request $request){

        $request->validate([
            'avatar' => 'required|image|mimes:jpeg,png,jpg,gif,svg|max:2048',
        ]);

        $user = Auth::user();

        $avatarName = $user->id.'_avatar'.time().'.'.request()->avatar->getClientOriginalExtension();

        $request->avatar->storeAs('avatars',$avatarName);

        $user->avatar = $avatarName;
        $user->save();

        return back()
            ->with('success','You have successfully upload image.');

    }
The above code does following
- Validates the image uploaded to be of correct format and checks the size not to be greater than 2MB.
- Next we create the avatar filename that we want to save it with. We use storeAs method on the file parameter to save the file under storage > app directory.You can read more about File Upload in Laravel.
- Next we save the filename in corresponding row of user's table.
Since we want the images uploaded to storage directory to be public. Do following.
- Change disk config : Open filesystems.php which is located under public directory. Change the default parameter from local to public. By doing this file will be stored in storage/app/public directory.
'default' => env('FILESYSTEM_DRIVER', 'public'),2. Symlink. Put a symlink from /public/storage to /storage/app/public folder, with one Artisan command:
php artisan storage:linkAlso for new user's place a default user.jpg file in the storage > app > public > avatars directory
That's it. Test the functionality. It should work absolutely fine.
Demo
Hope you had fun implementing this feature. If you find this article useful or if you have any questions, Feel free to drop in your comments.